A lot of people sew their own pillowcases to make their house look more like a home. This article will teach you how to sew a pillowcase by hand.
Having trouble finding the perfect pillowcase to match your color schemes? Are you good at sewing? It might be difficult to find the right pillowcases when you have that perfect one in mind. Nothing that you see on the market will be just right. For this reason, a lot of people choose to sew their own.
Sewing your own pillowcase also makes for a great hobby. Sewing can be a very calming activity, and a lot of people take it up to reduce stress and anxiety. You can learn more about this by checking out this article on the calming effects of sewing.
If you’re either one of these people, this article will serve as a handy guide on how to sew a pillowcase by hand. Even if you’re new to sewing, we’ll guide you through the process.
How to Sew a Pillowcase by Hand
Since we’re talking about sewing by hand, you will not be using a sewing machine for any part of this process. You will only need a sewing needle, thread and fabric, as well as the pillow itself, a tape measure and pins.
Before Starting
Before you start sewing your pillowcase, you will have to complete some prep work. This will ensure that you end up with a pillowcase that both fits well and looks great once it’s finally on the pillow.
- Decide which pillow you’re going to be making a pillowcase for. Pillows come in a lot of different shapes and sizes. Guesswork in this step might cause your pillow to be too big or too small for your pillowcase. This could cause the finished product to look sloppy.
- Decide on which fabric you want to use for your pillowcase. Cotton is one of the most popular fabrics used due to its breathability. It is also easy to sew, clean, and is quite durable.
- Nylon, linen, satin, silk and velvet are other popular options when it comes to pillowcase fabrics. Each of these fabrics comes with its advantages and disadvantages that you need to consider before you get started. If you’re a beginner, we recommend choosing cotton.
- Measure your fabric against your pillow. The length of the pillow should be two inches longer on each side, while the width of the fabric should be two inches wider than twice the width of the pillow.
- Get a thread color that resembles the color of the fabric. While the thread will not be completely visible on the outside, your pillowcase would look much better with thread that blends into the fabric instead of standing out.
Once you have taken care of these steps, it’s time to start sewing.
Step 1: Fold the cut fabric evenly along the width. If there is any excess fabric at this point, you should cut it away. Make sure that there are straight lines on all four sides to give your pillow an even look.
Step 2: When you fold the fabric, the side of the pillowcase that will go on the inside should be facing out. This way, after you’re done making the stitches, you can turn the pillowcase inside-out to have smoother looking stitching on the outside.
Step 3: Leaving one bottom side of the pillowcase open, start putting pins two inches away from the sides. Space out the pins evenly across the remaining two sides of the fabric. This will let you get a good idea of how the size of the pillowcase would be once you’re done sewing.
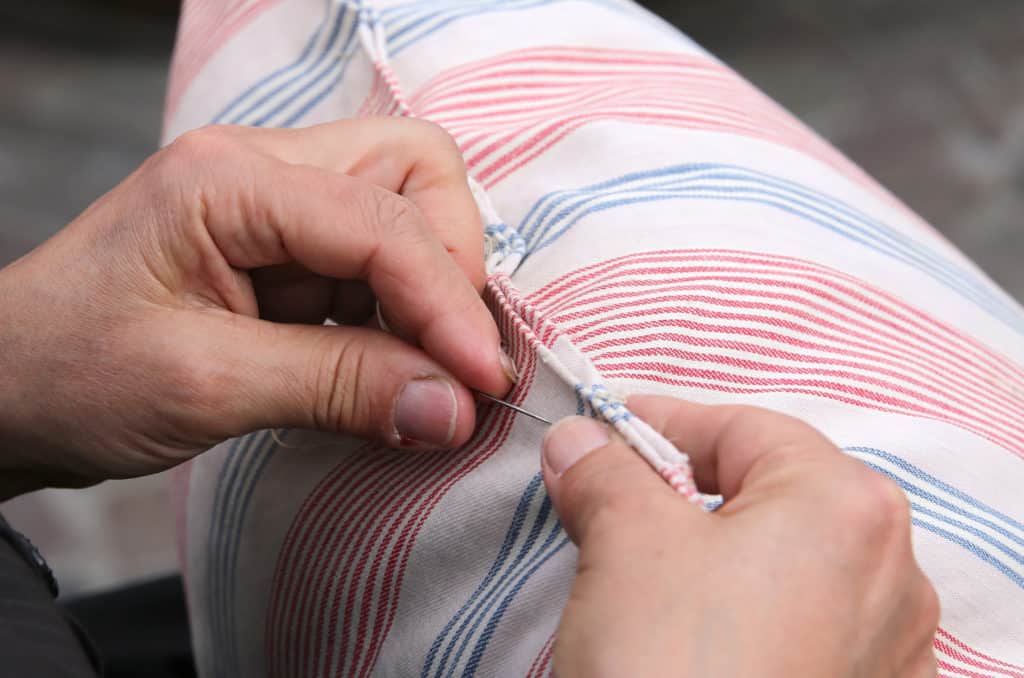
Step 4: Start sewing. Using your thread and needle, sew along the pins. Make sure that your needle is going through both sides of the fabric. Making small stitches with shorter distances in between will make your work look more professional.
Step 5: To finish up this sewing process, pull your needle and thread through the piece of fabric on the end. Do not pull this stitch tight. Once a loop is formed with the thread, put your needle through the loop and tighten to tie a knot. This step is quite important because it will prevent loose threads from pulling out when your pillowcase is finished.
Step 6: Using your scissors, cut away the fabric on all sides of the stitches. Make sure that you do not cut too close to the stitches, as this might cause them to tear off and leave holes in yours stitching.
Step 7: After making sure that there is no extra thread or fabric jutting out of the stitched pillow, you can turn your pillowcase right-side-out. You now have a hand sewn pillowcase.
If you want to go for a pillowcase exactly like one you would buy, you can leave some length along the longer side of the case when you cut and fold the fabric. This will give you enough material on one end for a flap, which you can then stitch into the folds to make your pillowcase more secure.
If you’re making a cover for a cushion, you can check out this article on pillow insert sizes to get a better idea of how much fabric you should use for your sewing project.
Bottom Line
Sewing can be a calming activity, and sewing a pillowcase is one of the easiest projects you can try out. Whether you’re looking for a leisurely activity to fill up your time or you want a pillowcase in a specific pattern and fabric that you cannot find online or in a store, knowing how to sew a pillowcase by hand can be quite a useful skill.